Make your own Smart Home using Arduino!
Story
In this Arduino IoT project, I will show you how to make a simple DIY Arduino Smart Home System that can control electrical appliances such as lights, fans, gates, etc suing our mobile phone from anywhere around the world. All you need is an Arduino board with network connectivity, some relays, and an android phone. Let’s get started.
Arduino Home Automation System Complete Video Tutorial
About Our Sponsor – PCBGoGo
This project is sponsored by PCBGoGo. PCBGoGo is a PCB manufacturer specializing in PCB prototyping, low-volume production, and neat and tidy PCB Assembly. They deliver high-quality PCB faster and cheaper.

As one of the most experienced PCB manufacturers in China, they pride themselves to be our best business partners as well as good friends in every aspect of your PCB needs.
Components Required
- Arduino Nano 33 IoT
- SSR
- An Android Phone with RootSaid – WiFi Command Center installed
- A WiFi network
Lets get familiarised with components
A solid-state relay (SSR) is similar a type of Relay. SSR is basically an electronic switch that switches on & off when a small external voltage is applied across its control terminals.
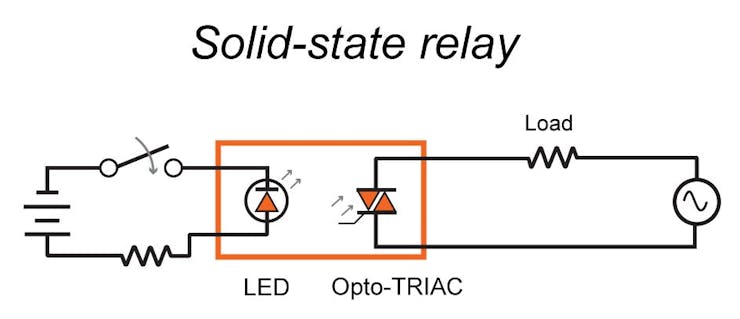
There are AC SSR, that works with AC voltages, DC, SSR that works with DC voltages and SSR that works with both AC and DC.
Arduino Nano 33 IOT
Newest to the Arduino Nano cousins – The Arduino Nano 33 IoT is the best Arduino board available if you want to add network connectivity to your project. Due to its small form factor, it is very easy to incorporate with existing projects.
Get more Details from here.
Note: There are somethings that are to be noted before working with this board. Arduino Nano 33 BLE only supports 3.3V I/Os and is NOT 5V tolerant so please make sure you are not directly connecting 5V signals to this board or it will be damaged. Also, as opposed to Arduino Nano boards that support 5V operation, the 5V pin does NOT supply voltage but is rather connected, through a jumper, to the USB power input.Home Automation system using Arduino
Steps
Step 1 – Designing the Circuit
Guys, I have designed a PCB layout where you can easily mount your Arduino Nano 33 IOT and your SSR, set this up without using messy wires and cables hanging around.
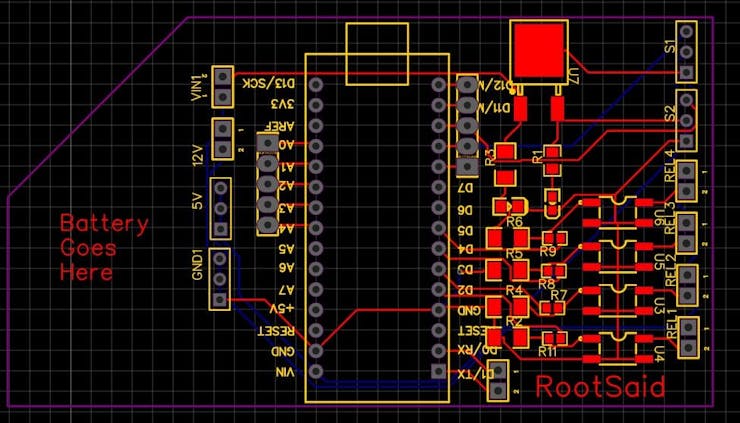
Get Complete complete circuit diagram and PCB Layout for Home Automation using Arduino.
Here, there are 2 voltage inputs – One to power the Arduino and other components on the board and another which will drive the electronic devices connected to the relay, which can depend on the devices.
Here I will be connecting LED strips that work on 12 V So, I will be connecting a 12 V DC adapter. The input power is connected to a 7805 regulator.
Step 2 – Download, Install and Setup Arduino IDE
This little board can be easily programmed using the world’s most user-friendly Open Source Platform – Arduino. This will be explained in detail below. So, to get started with our Home Automation system using Arduino, the first thing to do is download and install Arduino IDE from Here.
Step 3 – Coding
Now we will start coding!
Get Complete Code and information for Home Automation using Arduino here.
Step 4 – Install RootSaid WiFi Command Center from Google PlayStore
Arduino WiFi Command Center is a simple lightweight android application that can be used to control robots and Raspberry Pi and Arduino Home Automation over WiFi. All you have to do is connect your mobile phone to the network, enter the IP address and port of the server (the Arduino of our Home Automation system using Arduino) and control it using the On-Off buttons. Click here to know more about this App.

Click Here to Download this app from Playstore.
Step 5
Now all you have to do is start the App, enter the IP address of the Pi and port it is listening to (5005).

Load the IP and Port using the link button and navigate to the Home Automation Tab.

That’s it, your Home Automation system using Arduino is now ready. You can now control devices connected to your Arduino using this simple app and turn it on and off.

![[Solved] Unable to locate package linux-headers | How to Install Kali 2020 Headers | Install Virtual Box](https://hackersgrid.com/wp-content/uploads/sites/5/2017/08/kali-wallpaper-2015-v1.1.0-1.jpg)


