Portable Hacking Station Using Raspberry Pi
Let me show you how I made a portable hacking station using raspberry pi 3 and Hack using any android phone.
For your convenience and easy understanding and troubleshooting, I will be dividing this whole tutorial into 2 parts (Both in this same project itself).
In the First Part, I will teach you how to install kali linux and do basic setups on raspberry pi 3 and in the second part, I will show you how you can access the shell of pi from your phone and use it as a wireless hacking station.
Things Needed
For this project, You will need a Raspberry pi 3, a micro sd card greater than 8gb and A 5 v power source to powerup the pi.
Part 1
This is Step by Step explained Part 1 Video,
Download and Install Kali
First you will have to download kali linux image for raspberry pi 3.
Kali Linux Image – https://www.offensive-security.com/kali-linux-arm-images/
Next you have to write the image on the sd card. Connect the sd card to your computer using a micro sd card adapter. For formatting the card and writing the image, you will have to use 2 specific software. Otherwise it may not work. For formatting, use SDformatter and for writing the image use win32 Disk imager.
SDFormatter Download – https://www.sdcard.org/downloads/formatter_4/
Win32 Disk Imager – https://sourceforge.net/projects/win32diskimager/
First start SDFormatter, choose the correct drive, go to options, and make the changes as shown in the video, change the volume label and click format. Once it is completed, start win32diskimager, choose the correct drive, select the image and click write. It will take some time.
Log in and Resize the Partition
Once its finished you have to remove the sd card and carefully insert it into the micro sd card slot of raspberry pi. Connect the keyboard, mouse and monitor to the pi. Once everything is done, powerup the pi. If everything you have done till now is correct, pi will start to boot up.It will ask for username and password.
Default username is ‘root’ Default password is ‘toor’
Click on “use default config”. Now connect to internet, add correct repositories in sources file as shown in the video. Just add those lines in the source file and execute ‘apt-get update’ and ‘apt-get upgrade’ in the terminal. Expand the partition using gparted. Install gparted. Now open gparted, select the partition, click resize and drag the bar to the right end. Click apply. Now check the block memory allocation again. all 29 GB is in use. Now you can install whatever software you want and use raspberry pi as a normal PC.
Part 2
This is Step by Step explained Part 2 Video,
Installing raspi-config
Now, we have to install raspi-config in our Kali Linux OS.
Go ahead and download.
Go to the directory, unzip the file, change the permission of the file and install it.
Just try to open it. Sometimes when you open raspi-config, the error as shown in the video may occur. We can simply solve this issue by manually mounting the boot partition.
Create a user pi and secure the account with a password.
Open raspi-config, go to boot options. what we want is our pi to automatically login as a user when we power on the pi. In the boot option, we can create an autologin for a user ‘pi’ by selecting the 4th option. This will make the pi to automatically login to the desktop as user pi every time we start the pi. Select finish and reboot.
If what we have done is correct, the pi will automatically login as the user pi when it boot up. Since it is a new user, we have to do some initial setups. click use default config. Check the username. open up the terminal and type whoami
Creating Wireless Network for Our Pi
Next we have to create a hotspot in our mobile phone. take your phone, go to tethering and portable hotspot. Give it a name, a password and turn on wifi hotspot. This wifi network will be visible in your pi. Now select that network, enter the password and connect to that network. A very important thing is that, you should only connect to your wifi network using you inbuilt wifi with broadcom chipset only.
Go to network manager, general tab and tick the first two option so that it will automatically get connected to this wifi whenever it is available. now lets check the IP address.
Now in your phone, download and install any ssh app. I am using juice ssh. create a connection, give it a name , the ip address and create a username root with password for root that is toor. Then connect it. We will get the shell of raspberry pi in our mobile. Now you can give any command through ur phone to our raspberry pi.
Everything is working and now you can just shutdown the pi and disconnect the monitor keyboard and mouse. Now, whenever I power up the pi, it will boot up, automatically login as pi user and connect to our wifi network if it is available.
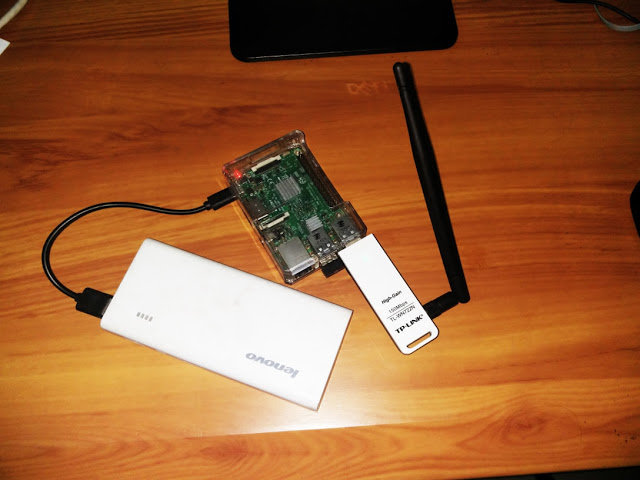
Now connect your TP link usb wifi adapter and power bank to the pi, and wait for it to boot up.
You should always use 2 interfaces for this purpose. this is because, for attacking wifi networks, you have to change the mode of interface from managed to monitor mode. This will terminate the connection of that interface to any network connected to it. So I used inbuilt wifi adapter to connect it with the mobile and TP link adapter for attacks.
After 5 minutes, try to connect it using Juice SSH. If it gets a connection, CONGRATS. it’s done!!
You can run any command in the mobile and it will be executed in the pie. You can keep everything inside your bag, walk around and do whatever you want and no one will be suspicious.
If you have any trouble building it up, Just let me know it in the comments.
Thank You!


It’s really a nice and useful piece of information. I’m glad that you shared this helpful info with us. Please keep us up to date like this. Thanks for sharing.